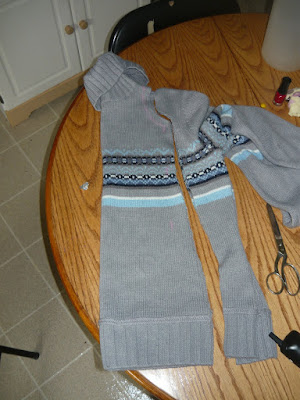
The first thing you want to do is cut the body of your dress. You can either do what I did here and cut it for the full length, or you can cut off the ribbing (if you have ribbing) and then cut the dress shorter and reattach the ribbing. I intended to do that at the end but Chris LOVES it at this length, and it's Nicole's favourite cozy dress as-is, too. I think this is cutest at knee length, though.
Use your nicely-fitting shirt, folded in half down the center and placed on top of your sweater, also carefully folded in half down the center. Trace around it with chalk, making sure it's wider than your turtleneck at the top. Kind of wing it with the armholes. You'll trim that up a bit later. Cut it out. Don't manhandle your sweater too much after you've cut it, you don't want it to start to unravel. As long as you're gentle it should be fine.
TIP: I actually like to use a sleeveless top to trace and cut the body of my shirt, and then trim up the armholes later with the help of my arm pieces.
Now the arms : one at a time, and starting at the cuff so you have a finished hem, carefully trace the sleeve of a nicely-fitting long sleeved shirt, then cut. Note that I lay my sleeve flat, underarm seam on one side, and then lay my sleeve out on top, matching the top and hem of the sleeve to my sweater sleeve. Once your sleeves are cut and them trimmed to match each other, compare the sleeve opening to the armholes like so and cut them to more or less match.
Now we pin! To make this easy, we're first going to pin the sleeves to the armholes, right sides together. Sew and then go back and zigzag to prevent the sweater from unravelling. Or serge, if that's an option.
Once that's done your sweater should lay out like so. Like how neat I keep my work surface? Don't lie, yours are similar. Anyways, now you pin your side seams and armpits up. Be careful to match stripes, if you have stripes, and match seams nicely, too. It's knitted, so you should be able to do a little tug and a little pull if things aren't perfect. Pin and sew and then zigzag to secure the seams and you should be golden!
If you haven't shortened the dress yet at this point and you still want to, pin up the amount you want to shorten the dress at the point where the ribbing turns into regular knit, if your sweater has a ribbed hem. Then sneak a seam in there. If that makes sense? If it doesn't then say so, I'll take a picture to illustrate my point.
If you don't have ribbing then just hem as you normally would, I guess. :3
Good luck, and let me know if i need to clarify anything!


What a GREAT idea!! The dress looks darling.
ReplyDeleteNice to meet you - I look forward to seeing what else you come up with and am off now to check out your recipes :-)
I love this idea! I just finished a dress for my daughter using your tutorial and thought I'd post pictures of the final product. http://twitpic.com/mn7l5
ReplyDeletehttp://twitpic.com/modld
A quick afternoon project the yielded an adorable, and better yet, free dress for my 3 year old! Thanks for your tutorial!