

As you may have noticed, I have kind of an incredible lineup of incredible people going on, here. If anyone is looking for the list of upcoming guests… there is none! Since it is summertime AKA Crazy Busy Time, I decided to keep the schedule to myself just in case anyone had to back out, or just plain forgot, or whatever. So, consider it like a cliffhanger, every day! Woo-hoo! Excitement!
I know.
I hate cliffhangers.

Okay, pay careful attention now, because this guest and the next are both named Susan. Today’s guest poster is one of the two faces behind Crafterhours. What is Crafterhours, you wonder?
Crafterhours is :
1) the hours after one’s small people are in bed when one can craft. Often the wee hours of the morning. It takes skill to craft in these hours, skill that I, personally, do not have. I also will not be awake at 2am for something I have not literally birthed.
2) an awesome blog that is full of everything from the most disgusting use of spaghetti that I have every laid eyes upon (and I’m sure kids gobble it down with absolute glee, much like Mud Pie), to adorable children’s & women's clothing, and even a shrug made out of diapers. No, really. (It was an April Fools gag, but I think the fact that an actual shrug made of diapers was sewn in completion AND WITH A TUTORIAL speaks volumes about the dedication, the attention to detail, and the sense of humour that makes this blog what it is.)
So without further ado, I present to you… SUUUUUUUSAAAAAAAAN! *scary arms* (No? Nobody else feelin a Monsters vs Aliens vibe?)

Hello, Laundry Liners!
I have a thrifty upcycle to share with you today. There are lots of things I like about digging around at thrift stores, one of them being discovery of fun t-shirts. I love to find cute graphics or blank shirts waiting to be embellished. But when I find a cute shirt that'd have to wait, like, 5 years before it could possibly fit my kid? That's not so practical. Or one that's way too huge or has a smudge or a tear somewhere around the edges? Bummer. Buuuut... the graphics are cute! I must have it and make it a home! Because of my love for homeless t-shirts, I have a pile of shirts that I couldn't resist picking up, and most of them cost $1 or less.
I have several crafty friends making big journeys this summer via airplane with small children. As I was collecting compact kid-friendly entertainment items for them the other day, I thought a cute pouch to keep them together might be helpful. I love using vinyl in pouches so that both kid and mom can see exactly what's being toted (no stealing silverware! no hiding grilled cheese remnants! there's that pony you've been looking for!) and accessed easily.
Need for container that stores compactly + thrifted shirts = upcycled t-shirt pouches.
I thought about calling it an upcycled tee bag. And then thought better of it. No joking about te(a) bags on a crafty blog.
So here's what I used to make mine: (my measurements)
- a t-shirt with a fun image
- a piece of vinyl to match the size of the image you're cutting out (9" x 11")
- a plastic zipper (metal isn't so friendly to little hands) (7")
- a strip of fabric for binding (2" x 45")
I started with a fun shirt that was a good 3 years away from fitting my oldest child. I'm trying not to plan quite that far ahead as wardrobes go. Although at times I'm tempted to be THAT obsessive.

The purple shoe has got to go. The recipient's mom is a purple-hater.

Trim your shirt down to the size you'd like your pouch to be.

And then trim a piece of vinyl to match. Note: if you buy vinyl at the craft store and then store your rolled-up vinyl and something else stored in the same spot squishes it, it ain't ever going to be completely smooth again. Even after ironing it carefully with a towel on top. But these are pouches for kid stuff-- if they were perfectly smooth to start with, it'd only last 47 seconds.

Now you've got two rectangles of equal size, one from t-shirt material and one from vinyl.


Place the vinyl on top of your knit and pin carefully at the edge if you like. Stitch carefully all the way around, as close to the edge as you can.

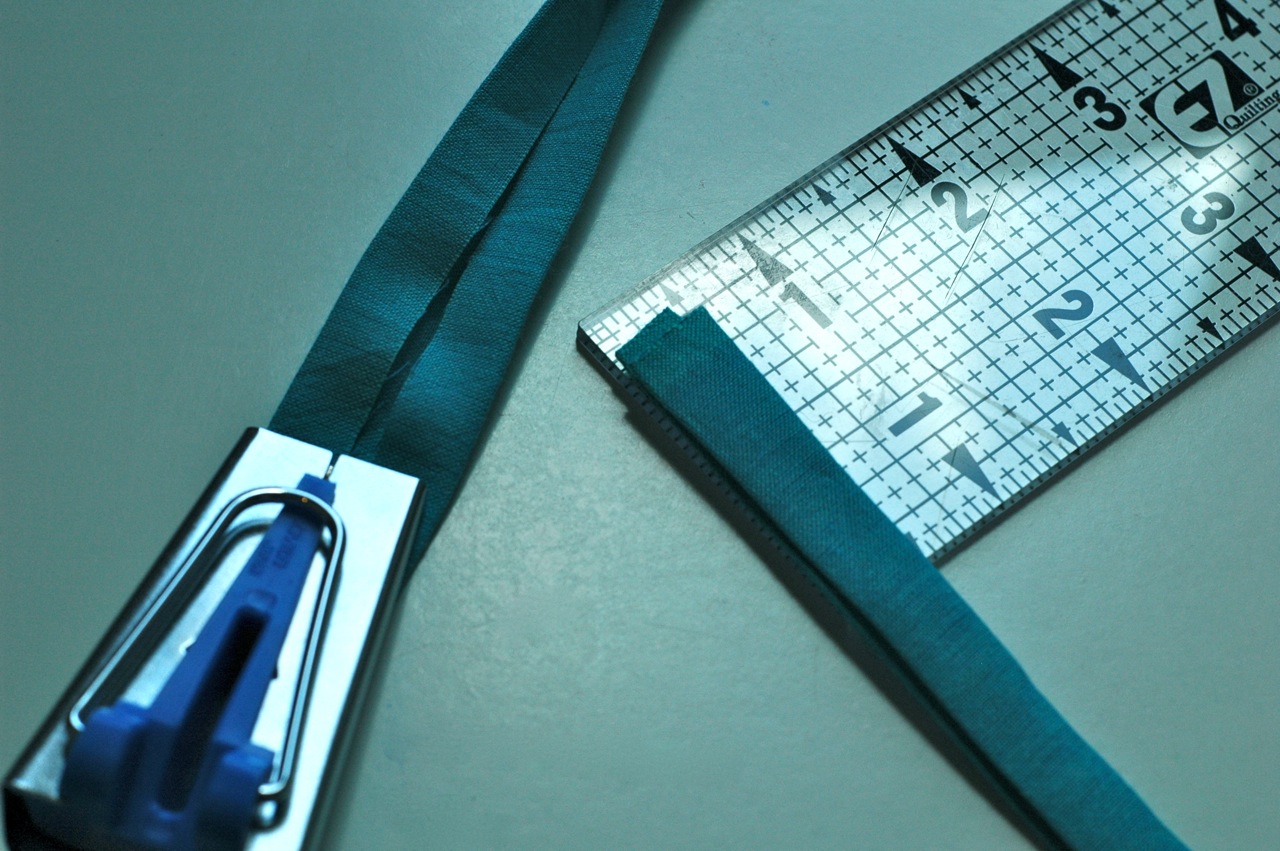
Make some binding tape. Unless you already have some on hand. I used a bias tape maker, size 25mm, which means that I cut a 2" wide strip and fed it through. The maker and my iron took care of folding it down to 12ish mm, or about an inch, and then folding it again brings it down to about 6mm or about 1/4". You could also use ribbon or twill tape.

Sandwich that around your knit and vinyl. Start stitching close to the interior edge while keeping an eye on both sides to make sure you're catching everything in the "sandwich". This can be pretty tricky with wiggly fabric, but in this case the vinyl helps keep things quite stable. I backstitched at each corner, lifted the needle and folded down the corner before beginning to stitch again. Makes nice, neat corners.


Where the ends met I folded the loose end in and stitched it down.

Ta da!

Here's the first one I made this time around. I didn't bother stopping and re-starting at the corners here and that made them rounder. I could've also just cut the corners rounder, but that would've involved making bias tape with fabric cut on the bias, and... it wasn't my day for such an involved operation. This one's designed to be quick!


If you are inspired to make something similar, I'd love to see it. Come on by crafterhours and let's talk! Thanks, Laura, for having me!


What a great idea! Thanks for stopping by ... I'm impressed with your handpainted hallway! :)
ReplyDeleteWhat a cool pouch!! I linked to your tutorial on Craft Gossip Sewing:
ReplyDeletehttp://sewing.craftgossip.com/tutorial-upcycled-t-shirt-pouch-with-vinyl-window/2011/07/14/
--Anne
Very clearly explained - looks fab.
ReplyDeleteAm pinning for future use. Thank you.
Those rock! I would never have guessed sooo cute would be sooo easy! Thanks for sharing!
ReplyDeletethis is really cool, but way beyond my skill set!
ReplyDeleteLove these and the adorable vintage print T-s you found. Adding this to the list of things I need to make when I see my roll of vinyl again.
ReplyDelete