home about top10 photo tutorials recipe


Showing posts with label kid craft. Show all posts

Thursday, January 12, 2012

P52 2012 - Hard At Work

IMG_1019

This week I had a project in mind for Nicole and I. She’s always asking me to sew for her lately, ever since I made her the Christmas dress. I’m quite pleased, don’t get me wrong, but it occurred to me to sew something WITH her. When I told her she was going to sew a skirt, she asked for the book Sewing Clothes Kids Love (amazon.com referral link) with excitement. I handed over the book, but gently told her that while she could definitely look for inspiration, for her first sewing project we were going to go for something a little simpler. And I’ll share more about that on Monday’s crafty post!

Look at me all following a pattern. Crafty on Monday, free days Tuesday and Wednesday, P52 on Thursday, and Friday Favourites on Saturday. Kidding. Anyways, we’ll see how long it lasts, but I’m happy with the structure so far… a little planning and structure around here has been a long time coming!

If you’re a blogger, do you follow a schedule, or go with the flow? And either way, do you think I’m crazy for wanting to ease into sewing with my 4 year old? She’s not into Zhu Zhu Pets or Barbies – although she loves LaLaLoopsy mini figures – but crafting is where her heart lies. Do you craft with your kids? Or do you leave crafts for school?

Thursday, September 8, 2011

Welcome to the Zoo

So I was sitting around staring at my kids the other day, admiring how well behaved they are (no, not really) and suddenly I decided to make a Chin Person. You know, where you put eyes on your chin and hang your head upside down with a tshirt over your eyes and nose and talk like a dork? No? Don’t leave me hangin’, here.

IMG00619

Anyways, so that was an epic failure because both the kids just tried to hit me and smear my lipstick all over my chin. I know, right? Apparently eyes covered = human piƱata.

So then since I had the facepaint out anyways, I decided to make Nicole into a lion. This one was a huge success. Nicole chased Olivia around the house rawring and ‘eating’ her. And then I spent entirely too much time making myself into a mime/clown, and then Olivia stared at me for a moment, then acted like she was okay with it until I got close enough. Then she lunged and scratched me across the face so hard she scratched the makeup clean off across my face. And this is that paint type of makeup that dries dry, so yes, ouch.

On the bright side, we found a bottle solution for my picky younger child. Formula from concentrate + drop in liner type of bottle + latex nipple*, NOT silicone. Picky, picky, picky. However, she is all ‘where have you been all my life’ about the combo, and while I’m still not planning to wean her completely yet (nor does she have an inclination to, every so often she makes it clear she’d like to nurse) she and I are quite glad we have come to this little compromise.


*(hello, creepy men from google search. This is not the latex + nipple combo you were looking for. Sorry.)

Wednesday, July 20, 2011

Summertime, and the Living is Thrifty–Maggie of Smashed Peas and Carrots

summertime
 
I am pleased as punch to introduce to you today the super-sweet Maggie of Smashed Peas and Carrots. Maggie is one of those people who I’m pretty sure I would have a ridiculously good time laughing with. I can’t prove this, but I bet she would have a Really Good Laugh. What am I saying, would. I bet she DOES have. By no means am I indicating that Maggie has lived a life that has and will be devoid of laughter unless we happen to cross paths someday. She has kids, I’m pretty sure laughing is right up there with crying and touching poop in the ‘Its Inevitable’ category.
 
Maggie not only runs a household that includes three kids under four, she also runs a fabulous etsy shop that has the same name as her blog, full of adorable goodies. When she’s not being awesome at everything… well, she might be sleeping. Bet she’s an awesome sleeper, too. But I digress. Maggie is a thrifty queen, as evidenced by this big ol’ roundup of just a sampling of the thrifty projects that she’s already done on her blog. Maggie also is the one who shared that Sopapilla Cheesecake recipe I keep raving about (quite awkwardly, as I’m still not sure to pronounce it.)
 
 
Hi everyone!!  I'm Maggie from Smashed Peas and Carrots!  I'm excited to be here today to share a round-up of some Thrifty Living ideas from my blog.  I am a momma to three little ones four and under and I also own my own small business with my husband.  I know the fear that Laura and her husband have right now of not having a regular paycheck coming every week or every other week when you work as an employee for sure.  When we first opened our business it was extremely scary for us to not know if we would succeed but we are doing great and I'm sure your hubby will do awesome too!!
 
It's cool to be thrifty peeps!  Now let's rock out the round-up!!
 
Since it's summer, let me first share a few ideas I have for entertaining the kids this summer:
 
Blank Postcard Printables are perfect to give to your kids when momma needs a little downtime!
 
 
A Scavenger Hunt (and another free printable!) will be hours of entertainment for car rides, wagon rides and long walks around the block.
 
Why spend money on bubble solution when you can make your own Best Bubbles Ever...so easy and you get like 10x more for your money!!
 
Same goes with liquid sidewalk chalk...don't by that expensive Crayola stuff!!  Make your own Liquid Sidewalk Chalk here!
 
Are you thirsty for more?  How about some thriftiness for your home?!!
 
Ever thought about making your own air freshener?  It's so easy and much better for you and the environment.  Check out how to make your own Natural Air Freshener here!
 
You can even make your own deodorant!  You only need 3 ingredients...really!  I have been using this recipe for Natural Deodorant for years and I can vouch that it really, truly works!!
 
Do you need some easy thrifty recipes?  I thought so!  Here are a few good ones I pulled from my blog:
 
No need to spend money on those taco seasoning packets...save your money and make your own plus it won't have all the added junk in the ingredients.  Enjoy my Taco Seasoning recipe for your next taco night :-)
 
Store bought pizza sauce?  Umm why, especially when you can make it yourself in less than 5 minutes!! Check out my recipe here!
 
And my last one, I swear!  Here's a super yummy recipe for DIY granola bars...they are chewy and customizable, perfect for adding in any mix-ins you want!  See my Granola Bar recipe here!
 
I hope you enjoyed a small hint of some of the Thrifty Living ideas you can find on my blog!  Thanks for having me Laura!!
XOXO,

Thursday, July 14, 2011

Summertime, and the Living is Thrifty–Susan @ Crafterhours

As you may have noticed, I have kind of an incredible lineup of incredible people going on, here. If anyone is looking for the list of upcoming guests… there is none! Since it is summertime AKA Crazy Busy Time, I decided to keep the schedule to myself just in case anyone had to back out, or just plain forgot, or whatever. So, consider it like a cliffhanger, every day! Woo-hoo! Excitement!

I know.
I hate cliffhangers
.

summertime

Okay, pay careful attention now, because this guest and the next are both named Susan. Today’s guest poster is one of the two faces behind Crafterhours. What is Crafterhours, you wonder?

Crafterhours is :
1) the hours after one’s small people are in bed when one can craft. Often the wee hours of the morning. It takes skill to craft in these hours, skill that I, personally, do not have.
I also will not be awake at 2am for something I have not literally birthed.


2) an awesome blog that is full of everything from the most
disgusting use of spaghetti that I have every laid eyes upon (and I’m sure kids gobble it down with absolute glee, much like Mud Pie), to adorable children’s & women's clothing, and even a shrug made out of diapers. No, really. (It was an April Fools gag, but I think the fact that an actual shrug made of diapers was sewn in completion AND WITH A TUTORIAL speaks volumes about the dedication, the attention to detail, and the sense of humour that makes this blog what it is.)

So without further ado, I present to you… SUUUUUUUSAAAAAAAAN! *scary arms* (No? Nobody else feelin a Monsters vs Aliens vibe?)

crafterhours

Hello, Laundry Liners!

I have a thrifty upcycle to share with you today. There are lots of things I like about digging around at thrift stores, one of them being discovery of fun t-shirts. I love to find cute graphics or blank shirts waiting to be embellished. But when I find a cute shirt that'd have to wait, like, 5 years before it could possibly fit my kid? That's not so practical. Or one that's way too huge or has a smudge or a tear somewhere around the edges? Bummer. Buuuut... the graphics are cute! I must have it and make it a home! Because of my love for homeless t-shirts, I have a pile of shirts that I couldn't resist picking up, and most of them cost $1 or less.

I have several crafty friends making big journeys this summer via airplane with small children. As I was collecting compact kid-friendly entertainment items for them the other day, I thought a cute pouch to keep them together might be helpful. I love using vinyl in pouches so that both kid and mom can see exactly what's being toted (no stealing silverware! no hiding grilled cheese remnants! there's that pony you've been looking for!) and accessed easily.

Need for container that stores compactly + thrifted shirts = upcycled t-shirt pouches.

I thought about calling it an upcycled tee bag. And then thought better of it. No joking about te(a) bags on a crafty blog.

So here's what I used to make mine: (my measurements)

- a t-shirt with a fun image

- a piece of vinyl to match the size of the image you're cutting out (9" x 11")

- a plastic zipper (metal isn't so friendly to little hands) (7")

- a strip of fabric for binding (2" x 45")

I started with a fun shirt that was a good 3 years away from fitting my oldest child. I'm trying not to plan quite that far ahead as wardrobes go. Although at times I'm tempted to be THAT obsessive.

The purple shoe has got to go. The recipient's mom is a purple-hater.

Trim your shirt down to the size you'd like your pouch to be.

 
And then trim a piece of vinyl to match. Note: if you buy vinyl at the craft store and then store your rolled-up vinyl and something else stored in the same spot squishes it, it ain't ever going to be completely smooth again.  Even after ironing it carefully with a towel on top. But these are pouches for kid stuff-- if they were perfectly smooth to start with, it'd only last 47 seconds.

Now you've got two rectangles of equal size, one from t-shirt material and one from vinyl.

Pin your zipper onto the front of your vinyl. This is a 7" zipper. Stitch it down, starting on the opposite end of the zipper pull and then stopping as you get close to it to wiggle the pull past your stitches so that you don't have a big swerve as you try to pass it. Stitch down one side, across the bottom and up the other.
 
 
After it's attached, trim a 1/4" opening out of the back side of the vinyl. Plenty of space for little hands to reach in and not be scraped by it.
 

Place the vinyl on top of your knit and pin carefully at the edge if you like. Stitch carefully all the way around, as close to the edge as you can.


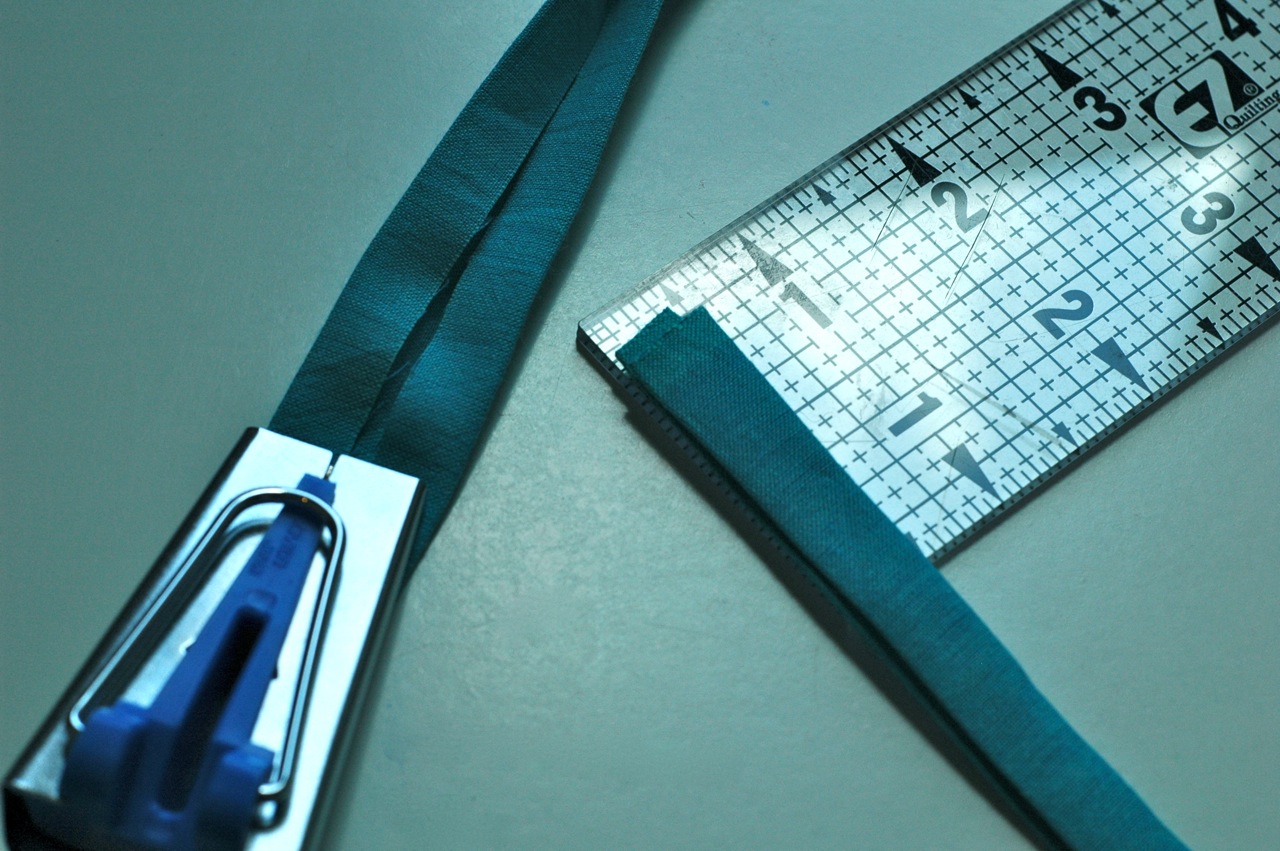
Make some binding tape. Unless you already have some on hand. I used a bias tape maker, size 25mm, which means that I cut a 2" wide strip and fed it through. The maker and my iron took care of folding it down to 12ish mm, or about an inch, and then folding it again brings it down to about 6mm or about 1/4". You could also use ribbon or twill tape.


Sandwich that around your knit and vinyl. Start stitching close to the interior edge while keeping an eye on both sides to make sure you're catching everything in the "sandwich". This can be pretty tricky with wiggly fabric, but in this case the vinyl helps keep things quite stable. I backstitched at each corner, lifted the needle and folded down the corner before beginning to stitch again. Makes nice, neat corners.

Where the ends met I folded the loose end in and stitched it down.


Ta da!

Here's the first one I made this time around. I didn't bother stopping and re-starting at the corners here and that made them rounder. I could've also just cut the corners rounder, but that would've involved making bias tape with fabric cut on the bias, and... it wasn't my day for such an involved operation. This one's designed to be quick!

They're ready to be filled with travel treats. I also like this style bag for toting embroidery projects, electronic gadget accessories, tiny doll accessories, hair accessories, coupons, receipts... you know, just about anything small that needs toting. The stretchy back fabric makes it a pretty flexible carry-all and keeps Mom's bag a bit more organized when Mom is called upon to be the carrier.

If you are inspired to make something similar, I'd love to see it. Come on by crafterhours and let's talk! Thanks, Laura, for having me!
 

Thursday, July 7, 2011

Summertime, and the Living is Thrifty–Cheri from I Am Momma, Hear Me Roar

summertime
Today’s guest is the beautiful and talented Cheri. She is the mother of two handsome little men and always has something ridiculously cool up her sleeve. Whenever friends tell me they have a hard time finding projects to do for or with boys, I send them Cheri’s way. Don’t hesitate to stop by there if you have a girl, though… she’s got projects for girls – and their moms! – as well. Cheri also has a great big heart, this year she is doing a series called Wake Up Wednesdays and each week she issues a challenge for improving yourself and the world around you. Cheri also has some amazing projects for helping your little ones have a Christocentric approach to things like holidays, and to have a heart for Christ let your light shine. I’m a pretty big fan overall, obviously. Lastly, but certainly not least, Cheri has amazing hair is a great friend. (Also, I want to go to Cheri’s house and do this activity. No, not my kids. Me.)
 
I Am Momma - Hear Me Roar
 
Hey!  I'm Cheri from I Am Momma Hear Me Roar.  When Laura asked me to be a part of this series I was excited.  Why?  Because she rocks (clearly) and because I loved the theme.  We've been trying to save money around our house as well and I love coming up with ideas that don't break the bank.
Since it's summertime and a lot of you have kids at home I wanted to come up with a thrifty idea that involved the kids.  So, I'm going to show you the Superhero Scavenger hunt I just did with my boys.  It didn't cost a dime and they absolutely LOVED it.
 
 
(First off, I adapted our hunt from an idea I saw HERE.  It didn't all come straight from this noggin :)  Here's how it went down.  My boys are REALLY into superheros.  However, you could obviously change the theme of the hunt to suit your needs.
It started off with Captain Cold and a note.  (My oldest is turning four, so I still had to read it to him, but he thought the notes were cool anyhow.)  It says, "I've captured all the superheros...now you have to find them.  Look up at the sky for your first clue."
 
We headed outside and hunted until we found Joker tied from a tree branch with a note.
 
 
His note read, "We were working together until he said he had a different plan.  He said something about setting the town on fire."  It was really fun to talk my kids through the clues.  They were so excited.  This one led to our firepit.
 
 
Batman was there with another note.  "He said 'fire' wasn't his style.  He said all the superheros were going to be frozen in time."
 
We ran to the freezer to find this.  (I had taken some tupperware the night before and filled it with water and some of his superhero guys.)
 
 
I told him he had to figure out how to rescue them.  The ice slid out of the tupperware pretty easily.
 
 
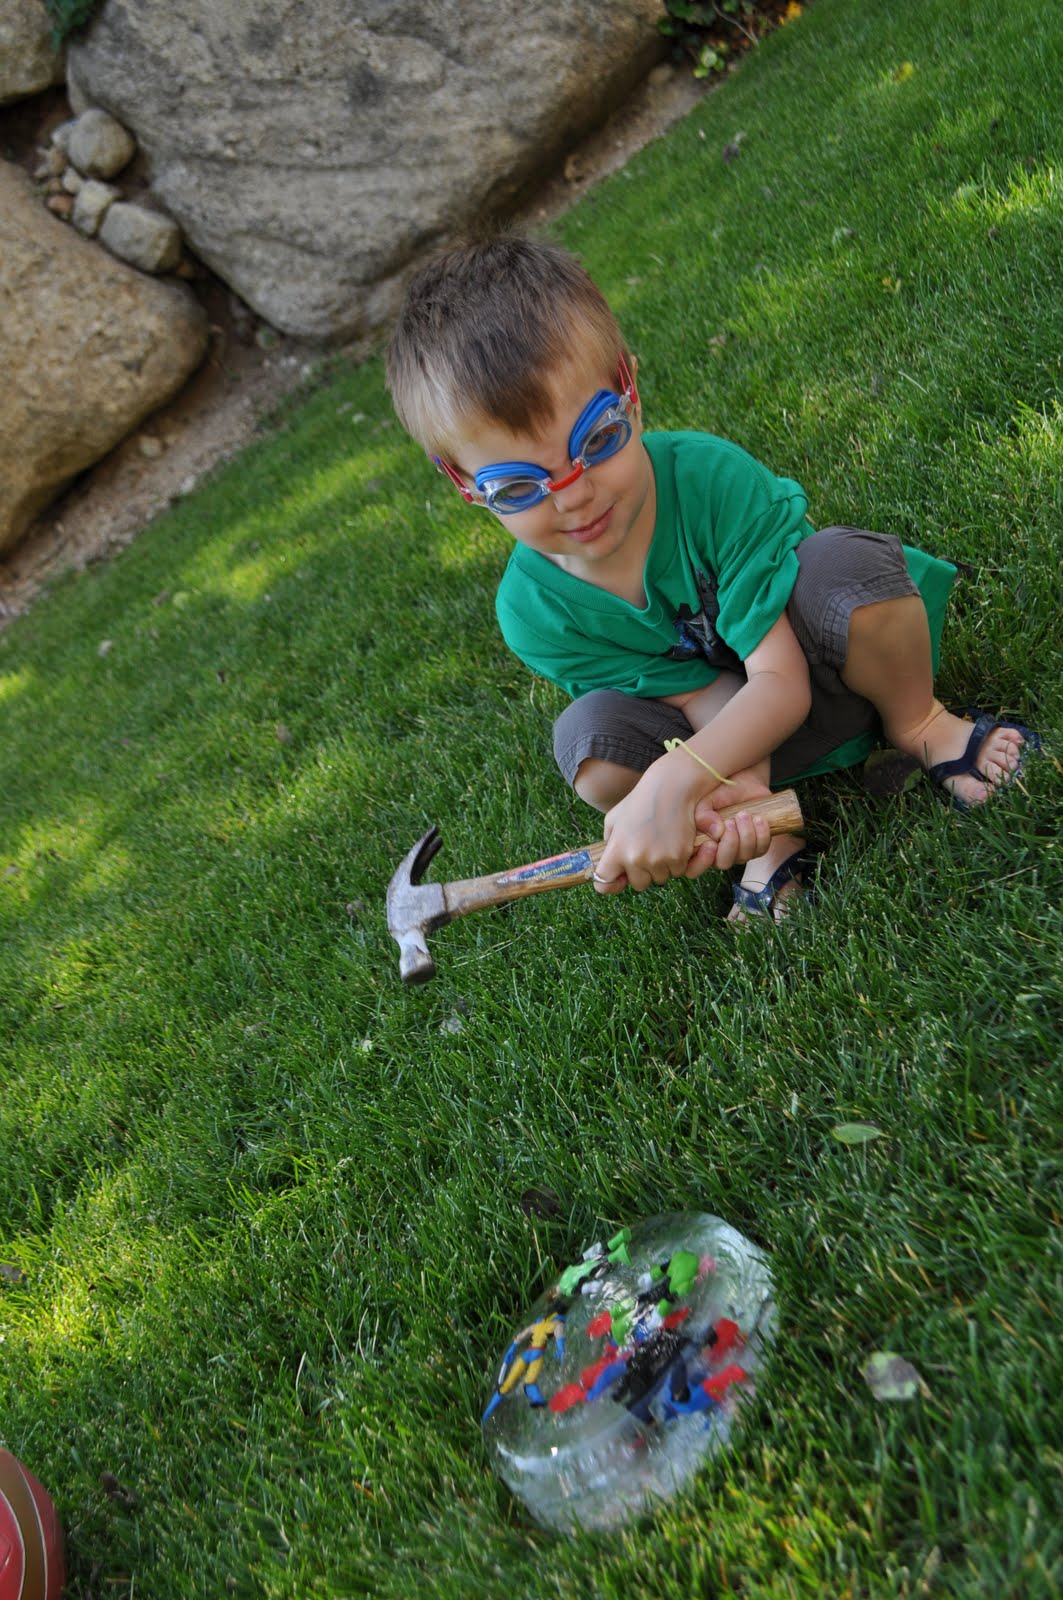
After a few guesses about how this might be done we got out the hammer (and our goggles, of course).
 
 
Superheros, a chance to use a hammer, goggles....let's just say he was in heaven.
 
 
After chipping away the ice we let the superheros recover in the warm sun.  That helped melt off the extra bits of ice as well.
 
 
Then we reveled in our victory.  Our city was safe again....thanks to Super Rex.
 
 
So, change it up, make it work, throw some toys in the freezer and you've got happy kids for an hour without spending a dime. 
Thanks for having me Laura!

Tuesday, July 5, 2011

Summertime, and the Living is Thrifty–Stef from girl.Inspired

summertime
Hey, everyone! I am thrilled to introduce today’s guest. Stef’s blog is total eyecandy. I could just sit there and sigh dreamily all the live-long day. Her projects often just scream dreamy&girly, and she always just blows me out of the water with her attention to detail. You can tell she puts a lot of thought and a lot of love into everything she does for the girls that inspire her, and in turn she is an inspiration herself. Today’s gender-neutral project definitely does not disappoint!


Girl. Inspired.
 
Hi there!  I'm so excited to kick off Laura's Summertime, and the Living is THRIFTY series.  I'm Stef and I usually blog over at girl.Inspired.  Today, though, I'm going to share a SUPER thrifty, SUPER fun project that is sure to keep your kiddos (and you!) occupied for a good chunk of a hot, summer afternoon!  I put together the "Build-a-Robot Kit" at Christmas, but the recent summer heat definitely called for pulling this out of the closet and giving it a go! 
 
 
If you have eager little ones like me, you'll want to put together this kit ahead of time.  The possibilities are endless, really, for the materials you can include in the kit.  I collected supplies from around the house including toilet paper rolls, cardboard boxes, styrofoam balls, tin foil, felt, pipecleaners.  I had to pick up some nuts, bolts, and springs from the hardware store, but if you're gutsy, you can just raid your hubby's tool chest!!  One can of metallic silver spray paint later and I had a very flashy pile of robot-makin'goodies. 
 
 
When we were ready to make our robot, I manned the hot glue gun and I let the girls do the creating.  They just told me what they wanted to use as the neck, legs, etc. etc.  I invited them into the operating room (garage) and they got a kick out of observing the surgical drilling of large holes where they could screw in the nuts and bolts.  Other nuts and bolts, we just glued right onto the box.
 
 
My five-year-old crumpled some tin foil into a heart and then wrapped a red pipe cleaner around it; the heart, of course, is my favorite part. 
 
 
Our robot continues to hang out on our kitchen table and he makes me smile every time I look at him.
 
 
So, how will your robot turn out?  And will it compete with your three-year-old's desire to cover herself with Hot Wheels tattoos? 
Related Posts Plugin for WordPress, Blogger...